
Updated August 14th 2023
As a part of my research activity on the Lightning Network tools, i prepared this full guide to run a complete Lightning system based on LNBITS and LightningTipBot by Calle. The goal of this guide is to install a full LightningTipBot on a VPS with all the necessary inside. You must remember that you need a funding LND source to connect all the system. This system makes possible to manage a wallet as a Telegram Bot, lightning addresses, LNBITS with LNURL functions, and NIP-57 features of Nostr, thanks to a recent implementation by Calle.
In order to start, what is needed is:
- An external backend source LND (you can connect to whatever you prefer, example Voltage or whatever);
- a VPS at least 40GB 4GB RAM, running Ubuntu 22.04. in this VPS all will be running except the LND source which is hosted elsewhere (for example Voltage);
- A domain name where you can configure the DNS. In this guide it will be example.com; You can register domain names at tritema.ch for example
About the software, please note that we are going to install all the following:
- Docker (in order to run Lnbits with postgresql);
- LNBits to be run as docker container;
- PostgreSQL to be run as a docker container together with LNBITS;
- Nginx on the host;
- Go language (to run lightning tip bot) on the host;
- Lightningtipbot from github, to run on the host;
Configure DNS
In this installation we used the user “dev” with sudo permissions. We install on a VPS. We make a A record to point to lnbits.example.com and another A record to point to example.com from the public IPv4 of your VPS, as follows
example.com IN A IP-OF-YOUR-VPS
lnbits.example.com IN A IP-OF-YOUR-VPS
We start installing pre-requisites needed to all the software we will install.
Install Docker
Docker is used to run Lnbits + postgreSQL on the local VPS. Start installing basic pre-requisites
sudo apt update
# install dependencies
sudo apt install gcc nginx certbot python3-certbot-nginx ufw
sudo apt-get remove docker docker-engine docker.io containerd runc
sudo apt update
Setup the docker repository
sudo apt-get install ca-certificates curl gnupg lsb-release
sudo mkdir -p /etc/apt/keyrings

curl -fsSL https://download.docker.com/linux/ubuntu/gpg | sudo gpg --dearmor -o /etc/apt/keyrings/docker.gpg

echo \
  "deb [arch=$(dpkg --print-architecture) signed-by=/etc/apt/keyrings/docker.gpg] https://download.docker.com/linux/ubuntu \
  $(lsb_release -cs) stable" | sudo tee /etc/apt/sources.list.d/docker.list > /dev/null
Install docker and docker-compose
sudo chmod a+r /etc/apt/keyrings/docker.gpg
sudo apt-get update
sudo apt-get install docker-ce docker-ce-cli containerd.io docker-compose-plugin docker-compose
Add the user “dev” to group docker
sudo addgroup dev dockerInstall Certbot
Install snap and then use it to install Certbot, which will be used to get Letsencrypt certificates needed by our domain names.
sudo apt-get update
sudo apt-get install snapd
sudo snap install core
sudo snap refresh core
and then
sudo apt-get remove certbot
# now install certbot from snap:
sudo snap install --classic certbot
create a symbolic link
ln -s /snap/bin/certbot /usr/bin/certbotInstall GO Language
Go language is necessary to build LightningTipBot
wget https://go.dev/dl/go1.20.1.linux-amd64.tar.gz
rm -rf /usr/local/go
tar -C /usr/local -xzf go1.20.1.linux-amd64.tar.gz
Install and configure LNBITS + PostgreSQL
download and build LNBITS from github repository
git clone git@github.com:lnbits/lnbits.git
cd lnbits
docker build -t lnbits .
Pull postgre official image from docker repository
docker pull postgresNow configure the docker-compose file in order to orchestrate both the environments
version: "3.7"

services:
 web:
   image: lnbits
   restart: on-failure
   stop_grace_period: 1m
   ports:
           - "5000:5000"
   volumes:
     - ${PWD}/data:/app/data
     - ${PWD}/.env:/app/.env
   environment:
     FORWARDED_ALLOW_IPS: "*"
   links:
     - postgres

 postgres:
   image: postgres
   restart: always
   environment:
     POSTGRES_PASSWORD: <CHOSENPASSWORD>
     POSTGRES_DB: lnbits
     PGDATA: "/var/lib/postgresql/data/pgdata"
   volumes:
     - ${PWD}/pgdata:/var/lib/postgresql/data
Configure LNBITS, create the .env file with these details
LNBITS_ADMIN_USERS="your_admin_userid"
LNBITS_DATABASE_URL="postgres://postgres:CHOSENPASSWORD@postgres:5432/lnbits"
# backend configuration
LNBITS_BACKEND_WALLET_CLASS=LndRestWallet
LND_REST_ENDPOINT=https://your-rest-endpoint:8080/
LND_REST_CERT=""
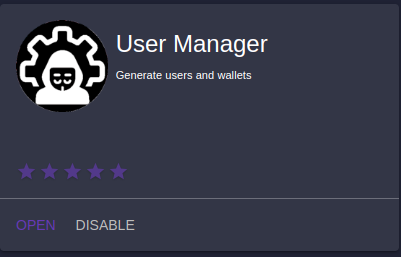
LND_REST_MACAROON="your-rest-macaroon"In the above file, set LNBITS_ADMIN_USERS the userid you can see in the LNBITS URL. Put that ID in that field and then restart LNBITS. When doing this and re-entering the interface, you will have the rights to install extensions. You then will be able to install USERMANAGER extension and enable it. It is very important in this install. As a backend you can use a Voltage LND instance for example.
Configure Nginx
Remove default file in /etc/nginx/sites-available/ and change with an empty one. Create a file lnbits.example.com.conf (in sites-available) with the following content:
server {
       # lnbits
       listen 443 ssl;
       server_name lnbits.example.com;

       access_log /var/log/nginx/reverse-access.log;
       error_log /var/log/nginx/reverse-error.log;

       location / {
               proxy_pass http://127.0.0.1:5000;

               proxy_redirect off;
               proxy_set_header Host $http_host;
               proxy_set_header X-Real-IP $remote_addr;
               proxy_set_header X-Forwarded-For $proxy_add_x_forwarded_for;
               proxy_set_header X-Forwarded-Proto https;
 }
       ssl on;
       ssl_certificate /etc/letsencrypt/live/lnbits.example.com/fullchain.pem;
       ssl_certificate_key /etc/letsencrypt/live/lnbits.example.com/privkey.pem;

}
Now create a another file example.com.conf in the same dir, with the following content. This configuration makes also the calls valid CORS. This is needed by many software, in particular by nostr clients.
server {
       listen 443 ssl;
       server_name example.com;

       access_log /var/log/nginx/reverse-access.log;
       error_log /var/log/nginx/reverse-error.log;


       location / {
               proxy_pass http://127.0.0.1:5454;

               proxy_redirect off;
               proxy_set_header Host $http_host;
               proxy_set_header X-Real-IP $remote_addr;
               proxy_set_header X-Forwarded-For $proxy_add_x_forwarded_for;
               proxy_set_header X-Forwarded-Proto https;
               add_header "Access-Control-Allow-Origin"  *;
       }
       ssl on;
       ssl_certificate /etc/letsencrypt/live/example.com/fullchain.pem;
       ssl_certificate_key /etc/letsencrypt/live/example.com/privkey.pem;

}
Activate the nginx site, by creating a symbolic link
sudo ln -s /etc/nginx/sites-available/example.com.conf /etc/nginx/sites-enabled/example.com.conf
sudo ln -s /etc/nginx/sites-available/lnbits.example.com.conf /etc/nginx/sites-enabled/lnbits.example.com.conf
Now you have to generate the certificates for both, so you have to run the following command for the domain lnbits.example.com and then for example.com . This procedure needs you are able to set a TXT record in your DNS facility.
sudo certbot certonly --manual --preferred-challenges dnsAfter issuing the certificates for both the domains, you need to restart nginx:
sudo /etc/init.d/nginx restartNow run LNBITS. It will connect and autoconfigure to the postgresql database in a container and connect to the LND external funding source
cd lnbits/
docker-compose up -d
Install LightningTipBot
After cloned from repository, LightningTipBot needs to be build:
git clone https://github.com/LightningTipBot/LightningTipBot.git
cd LightningTipBot/
export CGO_ENABLED=1
go build .
Create a file config.yaml inside the dir, with the following content
bot:
 socks_proxy:
     host:
     username:
     password:
 tor_proxy:
     host:
 lnurl_public_host_name: "https://example.com"
 lnurl_server: "http://127.0.0.1:5454"
 lnurl_image: true
 admin_api_host: localhost:6060
telegram:
 message_dispose_duration: 10
 api_key: "your_botfather_api_key"
lnbits:
 url: "https://lnbits.example.com"
 admin_key: "your_admin_key"
 admin_id: "your_admin_id"
 webhook_server: "http://public_ip_of_your_local_vps:5588"
 lnbits_public_url: "https://lnbits.example.com/"
database:
 db_path: "data/bot.db"
 buntdb_path: "data/bunt.db"
 transactions_path: "data/transactions.db"
 shop_buntdb_path: "data/shop.db"
 groupsdb_path: "data/groups.db"
generate:
 open_ai_bearer_token: "token_here"
 dalle_key: "asd"
 dalle_price: 1000
 worker: 2
nostr:
 private_key: "hex private key here"
In the above configuration file. Put:
- admin_key: in lnbits main view, click on API INFO (on the right), take admin_id
- admin_id: in lnbits, click on extension usermanager, on the right click on API INFO, then POST WALLET and take the admin_id variable there.
- api_key: it is the api_key you got from registering your new bot at botfather on Telegram.
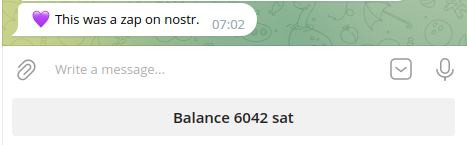
- private_key: this is the Nostr private key of the user which will impersonate the Nostr user managing the Zaps. If you want the Bot to work with Nostr zaps you must set this value.
Now you are ready to go. Just run the bot with
./LightingTipBotYour bot lightning address will be available with @example.com
Configure firewall
sudo ufw allow 22
sudo ufw allow 443
sudo ufw allow 5588
sudo ufw enable
Set the BOT to work with NIP-57 Nostr
The new release of LightningTipBot is implementing Nostr NIP-57. A user, willing to enable Zaps on their lightning address with the bot
Update Lnbits (docker version)
You should always put your setup uptodate. The most trick is LNBits. Lets see how to update it (using the docker version). in this example we are updating to 0.10.9
cd lnbits
git pull
git checkout 0.10.9
# before rebuild, be sure that Dockerfile is how you expect
docker build -t lnbits .
With the 0.10.9 version there is a trick to be added to the nginx configuration file. Otherwise you will get errors on sse. Here how to set your virtualhost configuration file in nginx. Thanks to Calle, Fabrizio and to all people who contributed on the Lnbits community.
server {
       # lnbits
       listen 443 ssl;
       server_name lnbits.example.com;

       access_log /var/log/nginx/reverse-access.log;
       error_log /var/log/nginx/reverse-error.log;

       location ~ ^/api/v1/payments/sse(.*) {
            proxy_pass http://0.0.0.0:8000;
            proxy_http_version 1.1;
            proxy_set_header Connection "";
            proxy_set_header Host $host;
            proxy_set_header X-Real-IP $remote_addr;
            proxy_set_header X-Forwarded-For $proxy_add_x_forwarded_for;
            proxy_set_header X-Forwarded-Proto https;
            proxy_buffering off;
            proxy_cache off;
            chunked_transfer_encoding off;
            gzip off;
        }
       location / {
               proxy_pass http://127.0.0.1:5000;
               proxy_redirect off;
               proxy_set_header Host $http_host;
               proxy_set_header X-Real-IP $remote_addr;
               proxy_set_header X-Forwarded-For $proxy_add_x_forwarded_for;
               proxy_set_header X-Forwarded-Proto https;
         }
       ssl on;
       ssl_certificate /etc/letsencrypt/live/ne.nepay.ch/fullchain.pem;
       ssl_certificate_key /etc/letsencrypt/live/ne.nepay.ch/privkey.pem;

}
Conclusion
If you found this guide useful and you liked it, you can tip me at my address massmux@sats.mobi . You can find me on nostr using NIP-05 go@massmux.com or npub1sej07d37lnfk592wlh9uv2dy68jv2y0ez98p6dw7w0llx89hswesvs5fqm or @massmux on twitter


